Cylinder Honing
In this article we will discuss the importance of a proper cross-hatch angle and a good plateau finish in cylinder bores.
In this article we will discuss the importance of a proper cross-hatch angle and a good plateau finish in cylinder bores.
Naturally cylinders need to be bored and honed - optimally with a torque plate in place to duplicate the distortive effects the cylinder heads have on the bore after they have been torqued in place. The bore must be cylindrical to allow the rings to seal evenly around their circumference and it must also have parallel walls, free of taper from top to bottom, this is done with a combination of boring and honing. The honing process follows boring and is carried out in an automatic honing machine using stones of varying grades to cut a crosshatch pattern into the walls of each cylinder.
 |
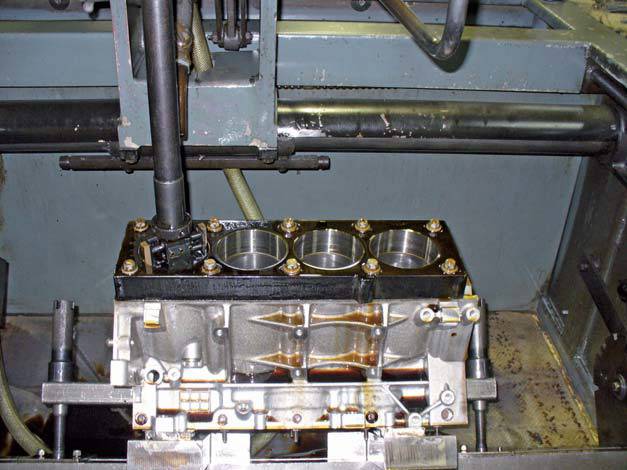
Chev LS1 block being honed using torque simulation process. | |
 |
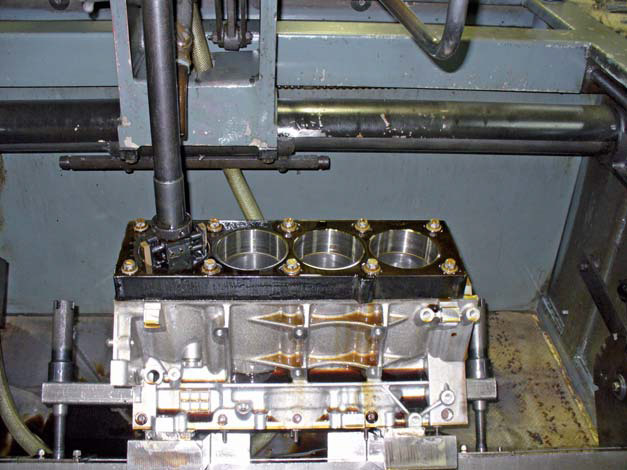
Closer picture of torque simulation plate used to replicate the distortion created when the cylinder head is installed, main caps are also installed and tensioned. |
The honed cylinder bore crosshatch angle determines ring rotation speed and its ability to promote proper oil migration up and down the cylinder wall. Most general application blocks use a 45 degree (included) angle, which is measured as half of that from a horizontal plane. Some applications today have angles as steep as 60 degrees and some very high-end race applications are as flat as 30 degrees. Longer cylinder bores with longer strokes generally require a steeper angle, as this helps to promote oil migration to the top of the cylinder, which, in turn provides proper lubrication. Shorter strokes sometimes use a shallower angle. Most commonly seen in today's race and performance engines is something in the 32-45 degree range - depending upon the specific application. Sometimes, too flat a crosshatch angle can cause the rings to chatter as they pass over it creating a loss of ring seal. Too steep an angle can create excessive oil migration causing the rings to line up and oil consumption problems. One of the most common problems we hear about today is what ring manufacturers refer to as crosshatch stacking.
Crosshatch stacking occurs when the crosshatch angle changes significantly from the top to the bottom of the cylinder. These angles should be consistent top to bottom in the cylinder bore. Generally, unequal angles are created by a machine operator being inconsistent with the stroke speed. Crosshatch stacking can also result from dwelling (not moving up or down) too long, when trying to make the bore round and then not going back over the area to remove the circular cuts created by dwelling. Visually, the cylinder appears to have angles going in every direction, many in a circular pattern. You will also see a pattern stacked on top of a pattern and that pattern appears fuzzy - almost like it's out of focus. This type of pattern almost always leads to an engine that burns blue smoke, as the rings are unable to properly remove the excess oil from the cylinder wall.
 |
Sunnen CV-616 automatic cylinder hone. | |
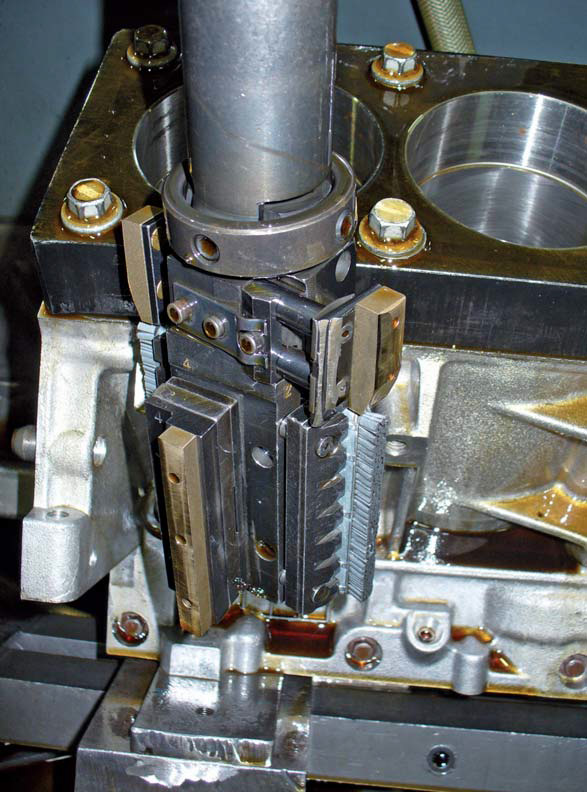 |
Close up of Sunnen hone head with final stage hone filament stones. |
Rings by nature plateau a cylinder through normal operation - we oftern refer to this as 'seating-in' the rings. The plateau finish occurs after the rings have worn away all the sharp points and burs on the surface of the bore, leaving small flat areas (plateaus) between the deeper cuts. In a conventional passenger car block with Brinnel harness of 160-170, seating-in happens fairly quickly, all on its own and provides the machinist a pretty wide range of forgiving finishes that can be cut into the cylinder wall. The modern race block or sleeve can have hardness numbers ranging from 210 to over 300 Brinnel and though the ring will eventually wear that surface into a plateau, it could take thousands of kilometers or hundreds of hours to do so and no one wants to wait for that. This long break-in period leads to excessive blow-by and other oil control issues.
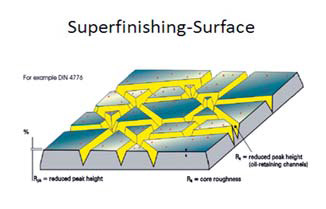
The ideal finish of a cylinder wall is made up of a pattern of scratches along the surface of the bore. Under magnification, these scratches make up a series of peaks and valleys. The piston rings run up and down along the peaks, and valleys act as oil reservoirs for lubrication to the cylinder.
Traditional honing methods tend to form sharp or folded peaks, (see figure 1 and 2) which is not ideal. During the 'bedding-in' process these peaks wear or break off and act as abrasives in the engine oil, promoting premature cylinder wear. In addition, the accuracy of the piston ring to bore clearance varies as the ring no longer rides against the top of the peak. The folded material also has a tendency to collect in the valleys, restricting the available space for oil to collect and therefore inhibiting lubrication of the rings.
With plateau honing, a different surface is achieved. The peaks formed during the initial honing are flattened and are free from sharp points and folds, eliminating breakage, (see figure 3) and promoting maximum ring seal. This creates clean troughs for optimum lubrication
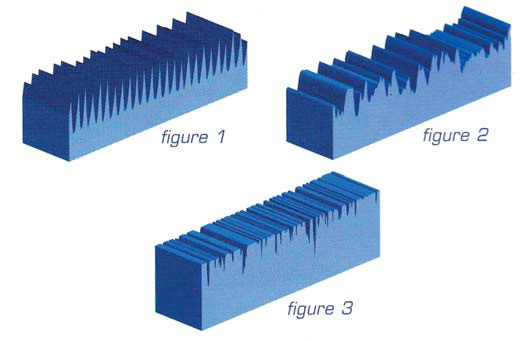 |
Fig 1 - magnified diagram of finish after boring. Fig 2 - magnified diagram after first stage of honing showing creation of valleys for oil retention. Fig 3 - magnified diagram after final stage of honing showing correct plateau finish |
The surface should be measured with a surface roughness tester, referred to as a Profilometer. That tool, in my opinion, is a critical instument and no engine shop should be without one. No one would grind a crankshaft without a proper micrometer to measure the journals with, would they? Without proper inspection tools we are just guessing and those guesses are usually nowhere near the actual surface finish texture. Consistency can be a major issue with today's very hard blocks and sleeves, when old style hand honing and hand stroking hone machines are used.
The ultimate aim is to achieve the correct crosshatch pattern and angle and the desired plateau finish to suit each individual engine for optimum performance. That can only be done with the right tools and the right measuring equipment.
 |
Magnified picture of an actual hone finish showing good crosshatch patten and plateau finish. |
Galloway Engines would like to acknowledge and thank Perth Street Car for the use of the information in their "Finishing Touch" article.